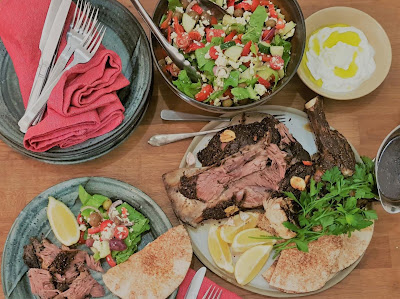
Mother’s Day Recipe: The Perfect Lamb Shoulder Recipe by Vintaged Bar + Grill’s Head Chef, Matthew Wood

Roast lamb is a staple Sunday meal that many people would be familiar with. This version is a tender and fragrant preparation that is best accompanied by something fresh, acidic, and vibrant. 

A classic Greek salad would be ideal, but so would some steamed green beans and baby chat potatoes with lemon and olive oil, so it really is up to you. 

Whole spices are the preference here and everywhere. They keep much longer, so they are less likely to have gone completely stale since the last time you used them. Plus cracked whole spices work particularly well on roast meats, think of the crust on a good pastrami. No need to pre-toast them though, the oven will do that work. 

Cooking time including preparation is roughly seven hours so get started before lunch. 


Roast Lamb Shoulder Serves 4 – 5 

• 1 ½ tablespoons whole coriander seeds 
• 1 teaspoon whole cumin seeds 
• 1 teaspoon whole black peppercorns 
• 1 tablespoon fine sea salt 
• ½ teaspoon paprika 
• 1 teaspoon dried oregano 
• ½ teaspoon dried thyme 
• 2 tablespoons olive oil 
• 1 whole bone in lamb shoulder 
• 1 whole head of garlic 
• 2 whole onions 
• 2 bay leaves 
• 3 tablespoon olive oil
• 750ml chicken stock 
• ¼ lemon 

1. Take the lamb out of the fridge at least an hour before you’re going to cook it and score the flesh lightly with a knife by making shallow cuts across the top of the meat, two or three millimetres deep. 

2. To make the spice rub, we need to first crack the whole spices. A mortar and pestle is perfect for this but failing that you can use a high speed blender. Just be sure not to leave it running, instead pulse it on and off until the coriander seeds, cumin seeds, and peppercorns are roughly crushed in three quarter sized pieces. 

3. Once you have cracked the whole spices, put them into a small bowl and mix in the salt, paprika, oregano, thyme, and olive oil. Rub this mixture all over the lamb shoulder and set aside at room temperature for one hour to marinate. While you’re waiting, preheat the oven to 220°C. 

4. Add the remaining 3 tablespoons of olive oil to a deep heavy roasting pan. Cut the two onions in half through the root so that they stay together, remove the skins, and place the four halves cut side down in the roasting pan. Cut the garlic head in half through the middle to expose the cloves and place it cut side down in the pan and group the onions and garlic together to form a platform in the middle of the pan. 

5. Sit the seasoned lamb shoulder on top of the onion-garlic plinth and roast in the oven for thirty minutes. 

6. Take the lamb out of the oven and turn the temperature down to 150°C. 

7. Add the bay leaves and chicken stock to the roasting pan, and then cover the whole thing with a lid of aluminium foil pinched down at the edges to stay attached to the pan. This will keep the shoulder of lamb moist but allow some of the steam to escape so it doesn’t sweat too much. 

8. Place the pan back in the oven for five hours, checking halfway through and toping up with a bit more stock or water if the pan appears dry. 

9. When the time is up, remove the pan from the oven and transfer the lamb to a serving platter. Remove the onions and garlic from the pan and strain the remaining liquid through a sieve into a bowl. 

10. Squeeze the head of garlic gently to remove a few cloves and discard the skin. Place these cloves on a chopping board with the onion halves and roughly chop into a coarse paste. Stir the onion mix through the strained pan juices with a small squeeze of lemon juice to make your sauce. 

11. Serve the lamb in the middle of the table with a small bowl of the onion gravy and the salad or vegetables on the side.

Since becoming a chef, Matt has worked in some top-flight kitchens including stints at ARIA and Stokehouse Q. Now Matt has taken on the role of executive chef at Hilton Brisbane, which includes overseeing the menu at Vintaged Bar + Grill

Want more recipes like this? Subscribe to our newsletter here

8 Easy Swaps to Make Your Meals Healthy

Can’t give up some bad habits? Do you love a sneaky soft drink or do you get the tub of ice-cream out for just two (six) scoops? Well, what if you could still enjoy them? You just have to be a little inventive and make some small changes.

Have you ever tried frozen banana in the blender? Well, it is a game changer, tastes exactly like ice-cream! You’re going to learn to make some simple changes that will have you eating healthy in no time.

1. Totally Tasty Pudding
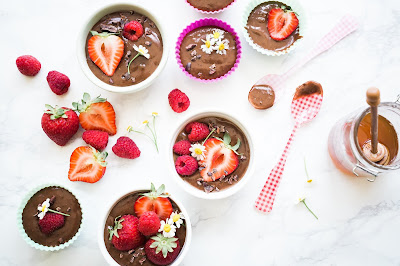
Chocolate pudding is great for when you want something decadent and sweet for dessert. Usually, this milk-based chocolate treat can get you into some calorie trouble.

Try cutting out some of the calories by using an avocado base instead of cream. Yes, that’s right, you can make your pudding with avocados. You want to blend some cacao powder, non-dairy milk, avocado, and sweetener in your heavy-duty blender. Let the mixture chill in your fridge for a few hours. The result is creamy chocolate which is also really good for you.

Try using an avocado base (instead of cream) for your choc pudding

2. Make Your Own Chocolate Bars
If you find you a get a hankering for chocolate, try making it yourself. There is a huge difference between cocoa and cacao, so just by making the conscious decision to understand what is in your food, will significantly improve your health.

Cacao powder is packed with nutrients and tastes just as yummy as cocoa. We love making our own truffles, it only takes a few simple ingredients such as coconut oil, cacao powder and sea salt.

3. Can’t Give Up Mac and Cheese?
Processed pasta is not a good thing to eat on a regular basis. Get rid of boxed mac and cheese and make some at home. You can make a velvety cheese-based sauce with added butternut squash. This sweet taste on mac and cheese is sure to be satisfying.

Take it a step further and replace your high carb noodles with a plant-based pasta made out of chickpeas or legumes. The texture may be a little grainier than regular pasta but it tastes almost the same.  

4. Get Your Snacks in Order!
Processed snacks might be convenient but you need to think outside the wrapper! With a little planning and prep, you can have all the snacks you need. Looking for something sweet? Create little packs of dates, almonds and coconut shavings. Like your savoury snacks try making your own bacon jerky or sundried tomato, feta & green onion muffins.


5. Sweet Dreams Are Made of Cheese
Whether it is salty, creamy, stinky or sharp we all have our favourite cheese. A pastime we couldn’t dream of giving up!

Have you ever made a cake and thought twice about having a third piece when you remember the two cups of sugar in it as well as the stick of butter! Well what if you could make your own cheese, then you will know how milk, cream and salt your consuming!

Start off with something easy like ricotta, all need is some milk, salt and a cheese bag (can’t find one, just make you own). You will be eating a delicious combination like blueberries and ricotta on sourdough or spinach and ricotta ravioli in no time!

Make your own delicious cheese


6. Homemade Muesli
Breakfast is the most important meal of the day, so start it off the right way.

Instead of kicking off the day with a bowl full of commercial cereal, which is sure to be filled with processed sugars and other preservatives, try having a bowl of homemade muesli as a healthy alternative!

Treat your body and taste buds the right way, by adding in your favourite fruits into your healthy homemade bowl of muesli!

Make your own muesli to reduce processed sugar

7. Use Steam Instead
Cooking veggies and fish by steaming them is a super healthy alternative. You retain all of their natural yummy flavours, whilst cooking them to perfection. By steaming your food, you’re adding no extra calories to your meal, making your favourite (usually unhealthy) meals, much healthier. You can top fish with flavourings like lemon and chilli and use the steam to infuse the flavours into your food.

8. DIY Pizza
You have two good options when it comes to pizza. You can make a pizza bread crust with cauliflower, but if is the classic pizza dough is that you crave? Then why not make it from scratch and just switch out what’s on top of the pizza?

So how do you get started? Have your homemade pizza dough ready – spread it out on a baking pan that has been properly floured – brush the pizza dough with some extra virgin olive oil and sprinkle on your veggies as well as a moderate amount of your favourite cheese. (If you’re feeling a little fancy, feel free to mix some black pepper, garlic powder and some of your favourite spices in with your veggies beforehand!)


9. Healthy Fried Rice, That Still Tastes like Rice
Rice can be good in moderation, however, if you find that when you cook it there is enough for the whole village (and you managed it eat it all) it might be time to find an alternative.

All you need to do is roughly chop your cauliflower and throw in a food processor for a minute. You will find that the texture is very similar to rice. Use this ‘faux’ rice can be used in any dish where you would have normally used white rice and it tastes just the same. One of our favourites is cauliflower fried rice, the family didn’t even blink an eyelid when I served this one up!

Educating yourself is crucial when it comes to eating well. Rather than denying yourself or overindulging just a few tweaks here and there won’t have you missing out on anything. Turn these ideas and behaviours into habits to ensure you lead the healthiest lifestyle possible (while still enjoying it)!

Brittnay Sharman has a BA in Health Science and her passion lies in creating a healthy lifestyle for her family

Want more tips like this? Subscribe to our newsletter here

CHRISTMAS RECIPE: Homemade Eggnog

We recently bought some Eggnog from the supermarket and the kids absolutely LOVE it. I dilute it with milk (it’s quite high in sugar) and add an ice-cube for the perfect after-school refreshment. Whilst supermarket Eggnog is tasty and convenient, it’s pretty easy to make your own (and reduce the sugar). Here is one tasty recipe I found: https://tastesbetterfromscratch.com/homemade-eggnog/
My husband also has some Butterscotch Schnapps I would love to try with this…


Lunchbox Ideas: Choc Chip Cookie Monster Recipe

It’s the first week back at school after the holidays. If you were scrambling for things to put in your child’s lunchbox this morning, try Ocea Marie’s healthy cookie recipe…

“I would buy so many cookies from the bakery section at the supermarket. It was ridiculous! As our eating habits changed and we developed a healthier relationship with food, finding cookies that weren’t filled with nasties became a challenge. So I took to the kitchen and after much ‘toddler testing’ here is what I call the ‘Choc Chip Cookie Monster Recipe’. It’s a perfect guilt-free treat to satisfy a craving and fits neatly in a lunchbox!” – Ocea Marie


Ingredients:

  • 1 cup Almond Meal
  • 1 cup Oats
  • ¼ cup Coconut Oil
  • 3 Tbsps Pure Maple Syrup
  • ¼ tsp Sea Salt
  • ½ tsp Baking Powder
  • 2 tsp Vanilla Extract
  • 150g Chocolate Chips


Method:
1. Preheat the oven to 160°C 
2. Blitz the oats until they have ’flour’ like texture.
3. In a medium bowl, whisk together the almond meal, oats, salt, and baking powder, then add the coconut oil, maple syrup and vanilla extract. Mix well until all the ingredients are wet.
Fold in the chocolate chips. 
4. Using a rounded tablespoon, scoop up the batter and then roll into balls, drop the cookie batter onto a baking pan lined with baking paper.
5. Bake for 12 – 15 minutes, until the edges are golden brown. 
6. Allow the cookies to cool on the baking pan. You can eat them while they are warm, be mindful that the melted chocolate chips are hot! I actually prefer the taste and texture once they are at room temperature.

TIP: Double the batch and freeze the extras, this is always my intention but never happens.

Ocea Marie is a Wife, Mumma, Nonna, entrepreneur, writer and eternal optimist dedicated to helping you live, love and create a little more abundance every day. Learn more at www.oceamarie.com

Want more ideas like this? Subscribe to our newsletter here

Healthy school lunch box ideas to have kids Eating Like A Pro

With kids returning to school soon, are you wondering if the lunch and snacks in your kids lunch box are the best and healthiest option? Anyone, including schools, might turn to the pre-packaged option when time is tight, and those are frequently full of hidden sugars and unhealthy fats.

The secret to packing a healthy, nutritious and simple lunch box is to make sure you are using real, fresh food and allowing a little extra time in the kitchen to prepare.

Below are some simple and healthy lunch box ideas from Eat Like A Pro by Beko and FC Barcelona’s nutritionist that will help you prepare delicious and nutritious breakfasts and snacks that will have the entire class envious.

Beko is a Main partner of one of the world’s greatest football clubs, FC Barcelona, so we know what the best athletes in the world eat to help inspire healthy eating habits in kids. Beko’s Eat Like A Pro recipes are created and approved by FC Barcelona nutritionists and are simple to make, helping parents take the challenge out of packing a healthy lunch for the little ones.

1. Make kids go nuts with fruits and nuts

The most natural, nutritious, and quick alternative for a snack is always a handful of seasonal fruits mixed with a nuts* such as almonds, walnuts, and hazelnuts to fuel your child’s day. The fresher the fruits and nuts, the better and try to avoid pre-roasted, salted or seasoned nuts as these have hidden and unhealthy additives.

No matter how many times brands write “all-natural” on their juices, bottled fruit juices are never the same as the fruit itself. Juices are typically rich in added sugars and receive heat treatment that destroys their vitamins. If the time and energy to squeeze the juice out of fruits seem like too much work, remember, you can always serve them whole or sliced up instead.

Sliced is one of the most fun ways to serve fruit because you can make your own creations out of it! Try arranging fruits and nuts to make shapes or faces, or you can even turn the nuts or seeds into a paste, like tahini. Grated coconut is always a fun ingredient and adds that element of yum to any banana or apple.

*Always check with the school on their allergy policies before including nuts in a lunch box.


2. Don’t forget the good ole’ sandwich

Sandwiches are a classic lunch box addition. Not only are they quick and easy to make but with the right ingredients they can be nutritious and healthy too. The way to a healthy and delicious sandwich starts with the bread. If you’re not making your own, we suggest you buy your bread from the bakery and make sure you’re picking a loaf made from wholegrain flour that has gone through a slow fermentation process.

Now comes the fun part: the filling! Avoid processed products like cold meats, commercial sauces, and jams or hazelnut cream. Instead, use fresh and natural ingredients like:

  • Guacamole
  • Hummus
  • Homemade nut pastes or fruit spreads
  • Fresh goats or sheep cheese with a spoonful of raw honey
  • Rocket or spinach.

With a little bit of imagination, you’ll be able to come up with lots of personalised sandwich designs for your kids and with a little added time and effort, you can prepare some envious lunch boxes.

Whatever recipe you choose, just remember these top tips:

  • If you use flour, make it wholegrain
  • If you want to sweeten things up, use natural ingredients like fresh or dried fruit (dates, dried apricots, raisins), cinnamon, vanilla, carob, or honey
  • Organic, unprocessed foods are always better than pre-packaged or processed options.
  • By following the above tips and using fresh and healthy ingredients, not only will you have your children eating like pros, but you’ll be prepping lunch boxes like a pro too!

Beko is the international home appliance brand of Arçelik Group and offers a wide range of major home appliances. Beko is No.1 in the European free-standing white goods market and the second largest home appliance brand in Europe in the white goods sector, and has been the fastest growing brand in the overall European market between 2000 and 2016.

For Beko, the smart generation is the greatest source of inspiration in pioneering future solutions. Beko offers a range of smart solutions to cater to the needs of different people, cultures and ways of life in more than 140+ countries worldwide by providing fast, flexible and energy saving home appliances with smart technologies and stylish design.

Beko is a Main partner of FC Barcelona and Australian Rugby Sevens star Ellia Green, and as a result knows exactly what the top players in the world eat in order to perform at their best. By highlighting to children and parents what their heroes eat, Beko hopes to inspire new eating habits with their latest campaign, ‘Eat Like A Pro’. Beko wants to support parents, particularly their children, to be active, eat healthy and encourage a healthy lifestyle.

Want more ideas like this? Subscribe to our newsletter here

Mother’s Day Recipe: Sunday Waffle Breakfast

Waffles are a firm fav in our household – they are versatile like pancakes and each family member can choose their preferred topping. Here’s how to make a delicious batch of waffles for mum on Mother’s Day…

Ingredients:
Serves 4

  • 2 cups plain flour
  • ½ tsp table salt
  • 1 tbs baking powder
  • ¼ cup caster sugar
  • 2 eggs, beaten
  • 1 ½ cups warm milk
  • 1/3 cup melted butter
  • 1 tsp vanilla extract
  • Milk and white chocolate chips, to serve
  • Mixed berries, to serve
  • Coloured sprinkles, to serve
  • Chopped mixed nuts, to serve
  • Whipped vanilla bean cream, to serve
  • Honey, to serve
  • Maple syrup, to serve
  • Orange juice, to serve


Method:
1. Preheat a waffle iron.
2. In a large bowl, combine flour, salt, baking powder and sugar and whisk together. In a small bowl, combine, eggs, milk, butter and vanilla and whisk to combine.
3. Add wet ingredients to the dry and whisk until smooth.
4. Grease both sides of the waffle iron. Depending on the size of your waffle iron, add 1/3 – 1/2 cup of batter, close the lid and cook for 3 minutes or until golden.
5. Serve your waffles stacked high with all the crazy toppings you can find.

Tip: The toppings are the best part! Try a berry coulis, a chocolate or a caramel sauce. Sliced banana, a big scoop of ice cream or your favourite chocolate bar sliced up. Let your imagination run wild.

This recipe was kindly shared with us by the team at Corelle
Want more recipes like this? Subscribe to our newsletter here


Mother’s Day Recipe: Mum’s Vanilla Spiced Creme Brulee

Crème brulee is my dessert of choice if it’s on the menu when I go out for a meal. Many of my girlfriends are also fans, so I reckon this dessert is a guaranteed winner for Mother’s Day. And you’ll get extra Brownie Points for making it yourself!

Ingredients:
Serves 4

  • 2 ½ cups (625ml) thickened cream
  • 3 egg yolks
  • 1 tsp vanilla bean paste
  • 3 tbs caster sugar, plus 1/3 cup extra for brulee top
  • 2 tsp cornflour
  • Mixed berries, to serve


Method:
1. In a Pyrex 4 cup capacity glass jug, combine cream, yolks, vanilla, sugar and cornflour and whisk. 
2. Microwave on high for 5 minutes and whisk. Continue microwaving in 1-2 minute increments until custard thickens to a dollop consistency. 
3. Divide custard between four Pyrex 1 cup capacity glass prep bowls.
4. Sprinkle 1 tablespoon of caster sugar over the surface of each custard in an even layer. Use a blowtorch to caramelise the sugar until golden. Serve with mixed berries.

Tip: Make these up to 5 days in advance and store covered in the fridge. Just dust with sugar and torch right before serving.

This recipe was kindly shared with us by the team at Pyrex

Want more recipes like this? Subscribe to our newsletter here

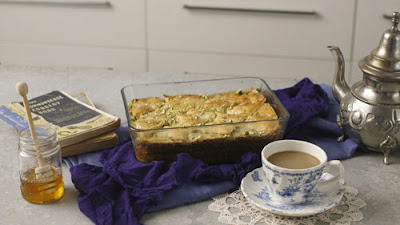
Mother’s Day Recipe: Grandma’s Baklava

Honey, nuts and cinnamon are such a comforting combination, especially when layered between sheets of filo pastry in this delicious Baklava treat. This recipe can be made in advance, and presents beautifully in a tin as a gorgeous handmade Mother’s Day gift. 

Ingredients:
Serves 15 (or one hungry mum!)

  • 200g pistachios, plus extra chopped pistachios to garnish
  • 200g walnuts
  • 100g caster sugar
  • 3 tsp ground cinnamon
  • 150g unsalted butter, melted
  • 375g filo pastry
  • HONEY SYRUP
  • 2/3 cup caster sugar
  • 2/3 cup boiling water
  • 2/3 cup honey
  • 2 lemons
  • 2 cinnamon quills
  • 12 cloves


1. Preheat the oven to 180 degrees Celsius (160 degrees Celsius fan-forced). Grease a Pyrex Simply Store 23.4cm x 18.8cm x 6.8cm (2.6L/11 cup capacity) glass baking dish with melted butter.
2. In a food processor, combine nuts, sugar and cinnamon and pulse to finely chop. 
3. Unwrap filo sheets and cut to fit dish snuggly. Cover with a damp tea towel.
4. Layer one-third of the filo pastry in dish, brushing butter between each layer. Scatter half the nut mixture evenly over. Top with half the remaining pastry, brushing butter between each layer. Scatter over remaining nuts, top with remaining filo, brushing butter between each layer. Cover with the lid and chill for 10 minutes. Use a sharp knife to cut into 5cm diamonds, cutting through all the pastry layers.
5. Bake for 1 hour 15 minutes or until golden. If the pastry is browning too quickly, cover loosely with foil.
6. Meanwhile, for the honey syrup, peel zest from lemon and juice flesh. Combine sugar, water, honey, lemon zest, cinnamon and cloves in a Pyrex Simply Store (460ml/2 cup capacity) glass container. Stir to dissolve the sugar. Cover loosely with the lid. Microwave for 3 minutes on high. Add the lemon juice, stir through and set aside to cool.
7. Remove and discard lemon zest, cinnamon quills and cloves from the syrup. Carefully and slowly pour syrup over baklava so it absorbs evenly. Set baklava aside at room temperature for 6 hours to cool completely (or overnight if possible). Scatter with extra pistachios if liked.

Tip: Baklava will keep in container at room temperature, covered with the lid for up to 3 days.

This recipe was kindly shared with us by the team at Pyrex

Want more recipes like this? Subscribe to our newsletter here

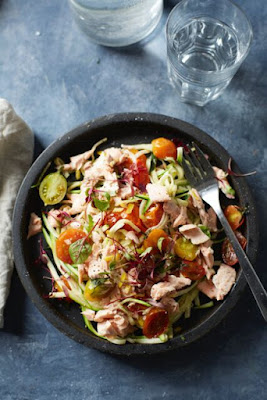
Mother’s Day Recipe: Poached Salmon with Zoodles

This delicious salmon recipe is the combination of lots of healthy ingredients, as well as sensational flavours. This would be a fantastic meal for Mother’s Day lunch or dinner. 

Ingredients:
Serves 2

  • 1 salmon fillet
  • 2 zucchinis – trimmed and julienned
  • 2 tbs olive oil
  • 1 punnet cherry tomatoes
  • Small handful basil leaves
  • 1 lemon – zested
  • Sea salt
  • Black pepper
Poached Salmon with Zoodles

Method:
1. Bring a pot of salted water to the boil.
2. Place the salmon in the water, return the water to the boil then remove from the heat and pop the lid on.
3. Cook for the salmon for 8-10mins depending on size of the fillet.
4. Heat the olive oil in a small saucepan on low heat.
5. Add the chopped toms and cook for 8-10 mins or until softened.
6. Remove the salmon from the water once cooked through and flakes into a bowl.
7. Add the zucchini noodles into the salmon water for 20-30 sec and remove and drain.
8. In a large bowl combine the tomatoes, salmon, lemon zest, ripped basil.
9. Drizzle with olive oil and season.

This recipe was kindly created  and shared with us by Whirlpool Ambassador, My Kitchen Rules 2013 semi-finalist, health coach and family man Scott Gooding. 

Want more recipes like this? Subscribe to our newsletter here

Mother’s Day Recipe: French Toast with Sweet Ricotta Cream and Maple Syrup

French Toast is one of my all-time breakfast favourites. This recipe gives it an updated twist with the addition of sweet ricotta cream and maple syrup. 


Ingredients:
Serves 2

  • 3  eggs
  • ¼  cup  (60ml)  milk
  • 2  tablespoons  sugar
  • teaspoon  vanilla  extract
  • 15g  butter,  melted
  • 4  thick  (Toast  size)  firm  white  sliced  bread, 
  • one  day  old
  • Cooking  Spray
  • Maple  syrup  to  serve
  • Seasonal  fruit  of  your  choice

Sweet Ricotta Cream

  • 200g  fresh  ricotta
  • 2  tablespoons  thickened  cream
  • tablespoon  caster  sugar
  • ½  teaspoon  vanilla  bean  paste

Method:
1. To  make  the  sweet  ricotta  cream,  place  ricotta,  cream,  sugar  and  vanilla  extract  into  a  bowl  and  beat  until  light  and  whipped.  Set  aside.
2. To  make  the  French  toast,  whisk  together  eggs,  milk,  sugar,  vanilla  and  melted  butter.  Pour  into  a  large  shallow  bowl  big  enough 
to  fit  the  bread  slices  in  easily.
3. Place  one  slice  of  bread  into  the  egg  mix  and  press  down  lightly.  Quickly,  turn  over  and  repeat.  Lift  out  of  the  egg  mixture 
and  drain  off  excess  egg  mixture  back  into  the  bowl.
4. Lightly  grease  the  inside  of  the  sandwich  rack  with  cooking  spray  and  place  soaked  bread  inside.  Bring  the  handles  together 
and  close  the  clip  to  keep  grids  together.
Insert  the  Sandwich  Rack  into  the  toaster  slot.  Toast  until  golden  and  set.
5. Once  French  toast  is  ready,  serve  warm  topped  with  a  dollop  of  ricotta  cream  and  a  good  drizzle  of  maple  syrup  and  fruit  of  your 
choice. Repeat  with  remaining  French  toast.

This recipe was kindly shared with us by the team at KitchenAid

Want more recipes like this? Subscribe to our newsletter here